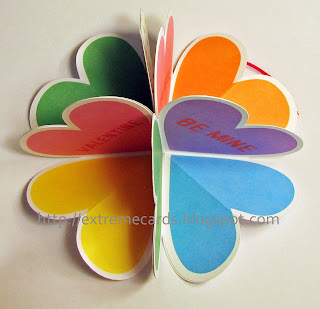
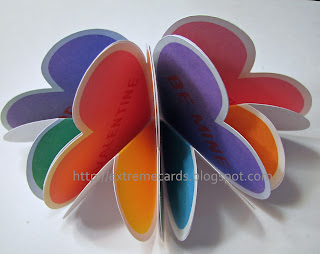
This Valentine card collapses flat. When the card is open the ribbons tie together to form the circle of hearts.
How to Make a Conversation Heart Circle Card
Download the heart sheet (PDF, Silhouette Studio, DXF).
Files download for free; pay what you wish for the tutorial and to support this site. Suggested contribution for this project is $1.99.
Print and cut twice to make four heart sets.
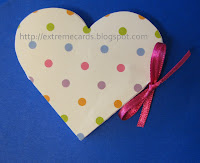
Cut two hearts from decorative paper using the cover pattern. This is for the front and back of the card.

Score (shown as red lines on photo) each heart set between the hearts.

On one blue/green/purple group, score the center line of the blue heart.
On the other blue/green/purple group, score the center line of the green heart.
On one pink/orange/yellow group, score the center line of the yellow heart.
On the other pink/orange/yellow group, score the center line of the orange heart.
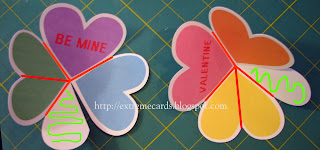
Crease all score lines.
Construct the four pieces: spread glue on each white half heart (shown as green squiggle) and adhere each one under the heart next to it (blue or orange).
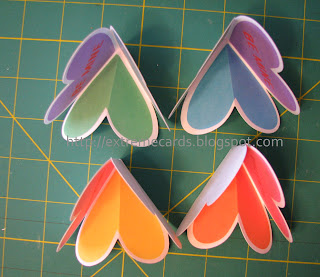
Arrange the pieces back to back in the order shown below.
Align the hearts carefully and use paperclips to hold them together after you glue them.
Starting with the heart set shown on the left side of the picture: glue the blue heart of the first set to the pink heart of the second. Glue the orange heart of the second set to the green heart of the third.
Glue the purple heart of the third set to the yellow heart of the fourth. Allow drying time.
Collapse the card flat.

Cut two lengths of thin ribbon, each about 5" long.
Tape one ribbon to the front of the card, right where the curve of the heart starts. Tape another to the back, exactly under the first ribbon.
Cover the front and back of the card with hearts cut from decorative paper.

Tie card shut.

Tie ribbons together to hold the card open.

Here's one by ARTGIRL.
Extreme Cards and Papercrafting: pop up cards, movable and mechanical cards, digital crafts and unusual papercrafts.


How to Make a Conversation Heart Circle Card
Download the heart sheet (PDF, Silhouette Studio, DXF).
Files download for free; pay what you wish for the tutorial and to support this site. Suggested contribution for this project is $1.99.
Print and cut twice to make four heart sets.
Cut two hearts from decorative paper using the cover pattern. This is for the front and back of the card.

Score (shown as red lines on photo) each heart set between the hearts.

On one blue/green/purple group, score the center line of the blue heart.
On the other blue/green/purple group, score the center line of the green heart.
On one pink/orange/yellow group, score the center line of the yellow heart.
On the other pink/orange/yellow group, score the center line of the orange heart.

Crease all score lines.
Construct the four pieces: spread glue on each white half heart (shown as green squiggle) and adhere each one under the heart next to it (blue or orange).

Arrange the pieces back to back in the order shown below.

Align the hearts carefully and use paperclips to hold them together after you glue them.
Starting with the heart set shown on the left side of the picture: glue the blue heart of the first set to the pink heart of the second. Glue the orange heart of the second set to the green heart of the third.
Glue the purple heart of the third set to the yellow heart of the fourth. Allow drying time.
Collapse the card flat.

Cut two lengths of thin ribbon, each about 5" long.
Tape one ribbon to the front of the card, right where the curve of the heart starts. Tape another to the back, exactly under the first ribbon.
Cover the front and back of the card with hearts cut from decorative paper.

Tie card shut.

Tie ribbons together to hold the card open.

Here's one by ARTGIRL.
Extreme Cards and Papercrafting: pop up cards, movable and mechanical cards, digital crafts and unusual papercrafts.
