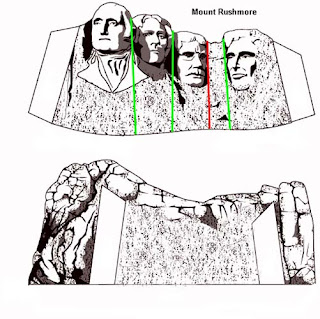
I've been wandering a bit far afield from pop up cards these last few months. Here's a quick one using a graphic from Papertoys.
The pop up is constructed using a basic form, a box with tabs, with the tabs moved away from the center of the card. Scroll down to Sample 4 in this tutorial to see how it's made.
How to make a Mount Rushmore pop up card
Download paper model.
I used Photoshop to clone the rock pattern on the piece without the faces, filling in the white part in the center. I also changed the color to a browner shade.
Cut out the piece with the faces and the piece with the rock background. Discard the base piece.
Cut off the glue tabs on the bottom of the face piece and the rock background.
Mountain fold the face piece vertically between the faces the presidents, as shown by green lines. Valley fold one crease beside Roosevelt, on the side of the blank space between him and Lincoln, shown by a red line. These folds give the mountain dimension. The folds need not be precisely placed, nor perfectly vertical. Just somewhere between the heads is fine.
Fold the glue tabs on the face piece toward the wrong side. Glue these tabs to the matching places on the rock piece. Allow to dry.
Creasing the face piece between Jefferson and Roosevelt, flatten the whole piece, letting the rock piece fold vertically where it wants to.
Make a base card big enough for the flattened Rushmore to fit in without poking out.
Line up the fold of the rock piece with the center fold of the base card. Slide the Rushmore piece horizontally away from the center fold of the base card just a little bit, maybe 1/2".
Spread glue on the wrong side of the rock piece, between the edge and where the tab is glued (on the other side). Close card. Flip card over and glue the other edge of the rock piece.
Extreme Cards and Papercrafting: pop up cards, movable and mechanical cards, digital crafts and unusual papercrafts.


