Aw, heck, is it December 1 already? Did you remember to say "rabbit, rabbit?"
I guess you'll have to save this project for next year. Of course, if you're as slow as I am you should start now :)
I have been working away on my Christmas cards, which take me for. ev. er. Take a look at my old ones here and you'll see why.
A big HELLO to visitors coming from not Martha. Yikes, my hits went through the roof yesterday.
Okay, back to the advent box....
You can make this kind of advent calendar with real, emptied, matchboxes--see Caroline's here--but then what do you do with 5000 matches? Or you can use a cutting die --see Monika's here--convenient, but uses a lot of paper.
I made my own boxes. I ended up making different sizes to accommodate different sized items.
The finished calendar is approximately 8.5" square, and 4" tall.
Paper list
Box 1: 2 pieces 12" x 12" for boxes, 4 pieces 8.5" x 11" for covers.
Box 2: 4 pieces 8.5" x 11 for boxes, 4 pieces 8.5" x 11" for covers.
Box 3: 2 pieces 12" x 12" for boxes, 2 pieces 8.5" x 11" for covers.
Box 4: 1 piece 12" x 12" for boxes, 2 pieces 8.5" x 11" for covers.
Five 8.5" squares of card stock for layer separators and top.
Box and cover sizes
Box 1, make 8: finished size 2" wide x 3.5" deep x 1" high.
Cut each piece 4" x 7.5".
Lay out to fit 4 on the 12" square paper.

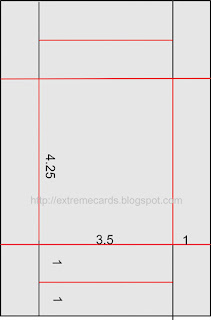
Measure and mark as shown. Cut on black lines, score on red lines.

Box 2, make 8: finished size 3.5" wide x 4.25" deep x 1" high.
Cut each piece 5.5" x 8.25".
Lay out to fit two per 8.5" x 11" paper.

Measure and mark, score and cut.

Box 3, make 4: finished size 4" wide x 3.5" deep x 1" high.
Cut each piece 6" x 7.5".
Layout on 12" square paper.

Measure and mark, cut and score.

Box 4, make 4: finished size 1" wide x 8.5" long by 1" tall.
Cut each piece 3" x 12".
Layout on 12" square of paper.

Measure and mark, cut and score. Cut away and discard the four corners as shown.

Assemble the boxes

Fold up the sides. Fold in the side tabs and overlap. You can fasten them together with a dab of glue or a piece of tape if you like.

Spread glue on the box ends. Fold the ends up and over the tabs. (The foldover on long, skinny box number 4 is a little scant. 12" paper is 1/2" too short! It won't be obvious in the finished boxes.)

Make box covers
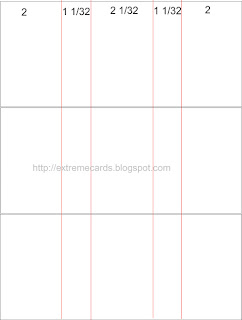
The covers are a tiny bit bigger than the drawers (1/32" on a side). This allows the drawers to slide open without sticking!

Box 1 cover
Layout to fit 3 on 8.5" x 11" paper.

Box 2 cover
Layout to fit 2 per 8.5" x 11" paper.

Box 3 cover
Layout to fit 2 per 8.5" x 11" paper.

Box 4 cover
Layout to fit 2 per 8.5" x 11" paper.

Wrap the boxes to make drawers
Wrap cover around box. Overlap ends and glue. Do not pull too tight!

Assemble layers
Lay down an 8.5" square of cardstock. Arrange one set of boxes on the cardstock. Glue each box to the base.
Mine is like the first layout, or you can flip everything mirror-image.


Make four layers.
Do a "dry fit." Stack the layers, rotating each successive layer 90° from the one below it.
Unstack the layers, keeping them oriented properly. Spread glue on the tops of the boxes on the lower layer and restack the next layer on top. Repeat with all layers, ending with an 8.5" square of cardstock. Decorate as desired.
Phew! If I got all those numbers written down correctly it will be a miracle!