I'm a big fan of cards from kagisippo. When I needed a cat pop up card I checked out her offerings. Indeed, she has a cat card for free, but it's gray, and I wanted brown. Off to her etsy store!
The pay version is a different design from the free one, which I did not realize until I started working on it. On the one I purchased, the back of the card is essentially unfinished. You can see the pop up mechanism, and the unprinted card stock on the back of the head and body. So....after I had the entire card constructed, I reverse engineered a cat body to cover the "offending raw edges." That was challenging. It came out well, considering!
I printed mine on beige paper. On the cat body piece that I created, I sponged a little brown ink to blend it in with the rest of the cat.
If you have purchased this file and would like to make a back for it,
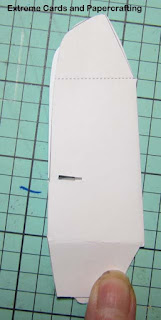
click here to download a pattern for the cat back in PDF format. It looks like this.
Follow the assembly directions that come with the cat, through step 3. You will have finished putting together the back pop up mechanism.
(FYI: The left tab of the cat back piece will be adhered right where my thumbnail is.)
Fold piece in half vertically.
Cut out a back piece.
Decorate as desired.
Score and crease dotted lines.
Overlap and glue at the center top.
Fold in half vertically.
Use tabs to adhere cat back to the cat body pop up mechanism. Apply adhesive to tabs and adhere to the back of the front layer.
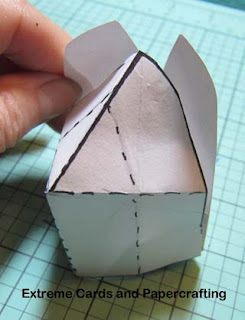
Expand the pop up mechanism--the two box-like "feet"-- and it will look like this from the back.
Continue card assembly with step 4.
The double sided card stock used throughout is from a pack called Watercolor Garden.
I printed mine on beige paper. On the cat body piece that I created, I sponged a little brown ink to blend it in with the rest of the cat.
If you have purchased this file and would like to make a back for it,
click here to download a pattern for the cat back in PDF format. It looks like this.
Follow the assembly directions that come with the cat, through step 3. You will have finished putting together the back pop up mechanism.
(FYI: The left tab of the cat back piece will be adhered right where my thumbnail is.)
Fold piece in half vertically.
Cut out a back piece.
Decorate as desired.
Score and crease dotted lines.
Overlap and glue at the center top.
Fold in half vertically.
Use tabs to adhere cat back to the cat body pop up mechanism. Apply adhesive to tabs and adhere to the back of the front layer.
Expand the pop up mechanism--the two box-like "feet"-- and it will look like this from the back.


