How to make a pop up card from origami stars
--Make the stars--
Make two origami stars. Tutorial
.jpg)
Cut four pieces of thread, at least 6" long each. Match the thread color to either the star color or the base card color. I have used black to make it easier to see.
Completely unfold the two stars.
Tear off 2 pieces of cellophane tape and lay one end of a piece of thread lengthwise on each piece the tape.
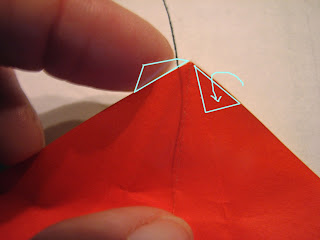
Take one piece of tape and stick it to the wrong side of one star. The tape should be centered (more or less) on the fold of the arm. The end of the tape should be at the tip of the point.

Wrap the corners of tape toward the right side of the paper.

The long end of the thread should extend straight out from the point.

Repeat on an adjoining arm of the same star.

Prepare two more pieces of tape and thread and tape them to two adjoining arms of the other star.
Refold both stars, taking care to put a firm crease in the points that you taped.


Flip the stars to the back side.
Arrange stars as shown, with the threads of the left-hand star extending to the left, and those of the right-hand star extending to the right. Look at the picture and make sure to arrange the overlap of the star arms correctly.

Slide the stars together, abutting the edges of the top arms.

Tape across the two stars near the bottom. This makes a hinge.

Fold on the hinge. One star will be lying on top of the other. They will not line up exactly on top of each other.
--Draft the thread hole template--
Measure the width of your star.

Cut a piece of scrap paper: width 3 times the width of the star; height 1.5 times the width of the star. (My stars were cut and folded from a 7" square. They end up about 4" across. Therefore my template is 12" wide and 6" tall.)
Fold template in half to mark the center fold line.
Measure in from one side edge an amount equal to the width of your star. Draw a vertical line. Measure in from the other side edge the same amount. You will have two lines--parallel to the center fold line, at equal distance from the center fold.
Lay your folded star pair on the template with the threads extending toward the center fold.

If you have drawn the vertical lines correctly, the points on the left will touch the vertical line and the point on the right will touches the template edge. (Mine is a tiny bit off--the right-hand point extends beyond the card edge. Oh well!)
Slide the star pair up and down as needed to center them vertically on the card. I just eyeball it, but you could measure if you like.
When you are satisfied with the vertical placement, mark where the star points hit the vertical line.

Open up the star pair flat and lay them in the center of the card. Re-align the star points and the marks that you just made.
Hold stars in place. Trace along the top left arm of the left-hand star and mark where the top edge meets the vertical line.

Slide the stars to the right, placing the point of the left-hand star on the dot you just drew. Mark the position of the bottom star point on the vertical line.

You now have a template with four thread points marked.
--Base card--
Cut a base card, slightly larger all around than the thread hole template. (You can trim it later if you like.) Fold in half.
Lay template on top of base card, aligning center folds.
Poke a hole at each thread point. Remove template and discard.
Use a needle to pass each star point thread from the front to the back of the card. (I'm showing this on the template. You will sew through your "real" card.)

Flip the card over.
Tie each pair of threads together and tape lightly to the back of the card.


Check to make sure the card closes properly.
.jpg)

Tape the threads securely to the card and trim excess thread.
Decorate the outside of the card, front and back, covering the threads with your design.
I glued a little glitter to the points of the stars.

---------------------------------
Now for a laugh. I found something that must be a translation of a translation of this tutorial. Here's a sample: Cut four pieces of pick, at least 6″ extended each. Match the pick color to either the big name color or the artless playing-card color. I demand familiar unspeakable to purloin it easier to foresee. Completely revealed the two stars. Take a unambiguous part of record and punch it to the ill-considered side of a unambiguous big name. Tear dishonest 2 pieces of cellophane record and discharge a unambiguous dВnouement of a part of pick lengthwise on each part the record.
Ummm...what? Okay, we must all be sure to "punch it to the ill considered side of a unambiguous big name".