How to make a flippix picture, also known as a "never ending card".
If you want to make up a blank flippix, I recommend following the instructions at Time for Crafting or watching the video at Dawns Stamping Thoughts.
Here is sequence for making a flippix with the pictures printed on it before it is assembled. If you have never made this card before, I strongly suggest making a blank one first.
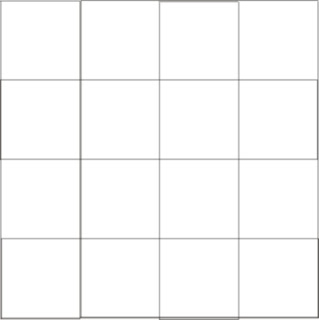
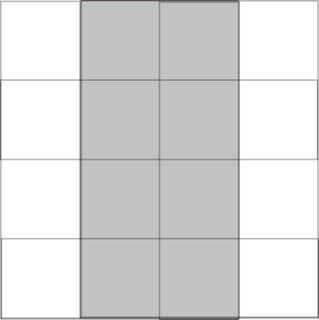
1. Create squares with a computer graphics program.
In program draw 4 identical squares. (I used 5" squares to fit two on a page of 8.5" x 11" paper.) You can add a border to the squares if you like. The corners may be rounded or left squared off.
Draw guidelines to divide the squares horizontally and vertically into quarters.
2. Select and add your pictures for the four different flips.
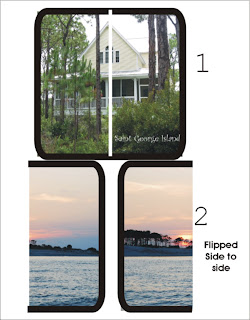
Place a picture or pictures on square 1, filling the entire square. This square will be cut vertically down the center, so be mindfull of where the cut will fall in your picture. I used one picture, but you can use any combination of pictures and text. It is best not to run the text across the center cut as it is difficult to line the two halves up exactly. Square 1 is visible in the first "flip", the starting postition.
Square 1 with picture added. Grey area denotes picture placement.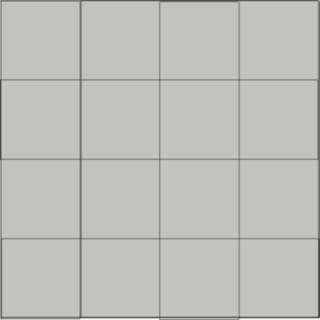
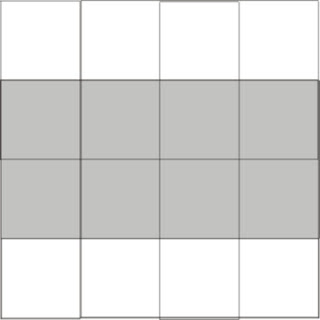
On square 2 you will need a picture that is the entire width of the card and half the height, placed across the center of the card. This picture will have a vertical cut down the center. Fill the remaining quarters (top and bottom) with a solid color. Solid colored portions of the card will be visible in later flips, so you can put pictures there, but you'll have to figure that one out yourself. Square 2 will be visible in flip 3. Only the middle (grey) portion will be visible in flip 3.
In this sample I used a picture that filled the entire square 2, not just the middle, because it's a pretty background color on the edges.
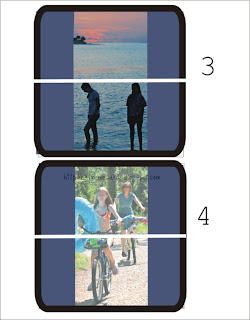
Fill all of square 3 with a picture. Square 3 will be cut horizontally across the center, so watch your placement. All of square 3 is visible in flip 4, the end position.
For square 4 you will need a picture that is the height of the card and half the width, placed in center of the card. This picture will have a horizontal cut across the middle. Fill the remaining quarters (right and left) with a solid color. Square 4 is visible on flip 2.
I had to cheat a little on square 3 and fill in the sides with parts of the same sunset from square 2 because my picture wasn't big enough.
3. Print and assemble squares.
If your graphics program does not have non-printing guidelines, remove them before printing. Print your squares and cut them out.
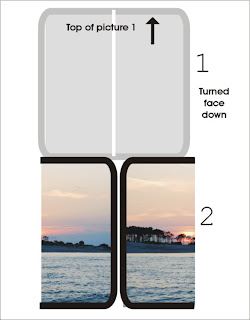
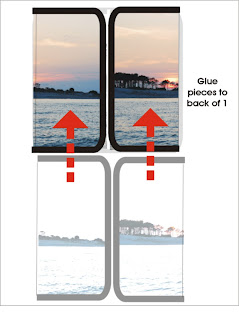
Start assembly with squares 1 and 2. Cut each square in half vertically.
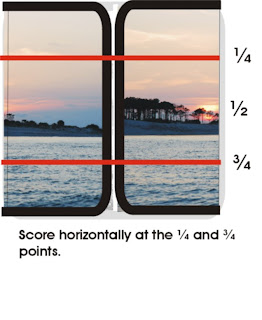
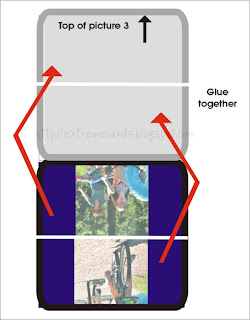
Glue squares 1 and 2 together as shown below. Score as directed.
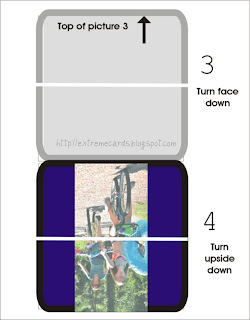
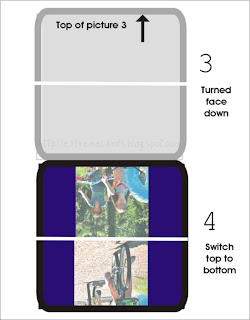
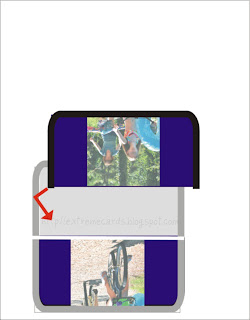
Cut squares 3 and 4 in half horizontally. Glue and score as shown.
 >
>

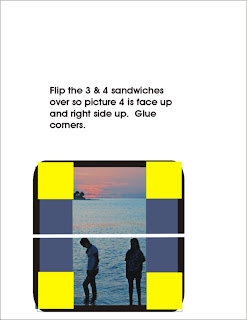
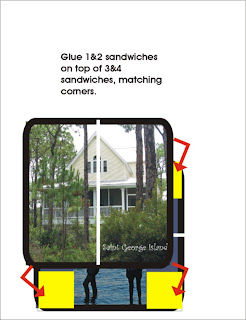
Glue picture sets at corners and allow to dry thoroughly before folding.
See previous post for finished flippix.
If you want to make up a blank flippix, I recommend following the instructions at Time for Crafting or watching the video at Dawns Stamping Thoughts.
Here is sequence for making a flippix with the pictures printed on it before it is assembled. If you have never made this card before, I strongly suggest making a blank one first.
1. Create squares with a computer graphics program.
In program draw 4 identical squares. (I used 5" squares to fit two on a page of 8.5" x 11" paper.) You can add a border to the squares if you like. The corners may be rounded or left squared off.
Draw guidelines to divide the squares horizontally and vertically into quarters.

2. Select and add your pictures for the four different flips.
Place a picture or pictures on square 1, filling the entire square. This square will be cut vertically down the center, so be mindfull of where the cut will fall in your picture. I used one picture, but you can use any combination of pictures and text. It is best not to run the text across the center cut as it is difficult to line the two halves up exactly. Square 1 is visible in the first "flip", the starting postition.
Square 1 with picture added. Grey area denotes picture placement.

On square 2 you will need a picture that is the entire width of the card and half the height, placed across the center of the card. This picture will have a vertical cut down the center. Fill the remaining quarters (top and bottom) with a solid color. Solid colored portions of the card will be visible in later flips, so you can put pictures there, but you'll have to figure that one out yourself. Square 2 will be visible in flip 3. Only the middle (grey) portion will be visible in flip 3.

In this sample I used a picture that filled the entire square 2, not just the middle, because it's a pretty background color on the edges.

Fill all of square 3 with a picture. Square 3 will be cut horizontally across the center, so watch your placement. All of square 3 is visible in flip 4, the end position.
For square 4 you will need a picture that is the height of the card and half the width, placed in center of the card. This picture will have a horizontal cut across the middle. Fill the remaining quarters (right and left) with a solid color. Square 4 is visible on flip 2.

I had to cheat a little on square 3 and fill in the sides with parts of the same sunset from square 2 because my picture wasn't big enough.

3. Print and assemble squares.
If your graphics program does not have non-printing guidelines, remove them before printing. Print your squares and cut them out.
Start assembly with squares 1 and 2. Cut each square in half vertically.
Glue squares 1 and 2 together as shown below. Score as directed.


Cut squares 3 and 4 in half horizontally. Glue and score as shown.


 >
> 

Glue picture sets at corners and allow to dry thoroughly before folding.


See previous post for finished flippix.