Building a Floating Tabletop Cake
Start by reading Building a Better Pop Up Cake: Part 1 and Part 2.
A different kind of pop cake design, posted by Craig on the Sure Cuts A Lot forum of Craft Edge, caught my eye.

It's based on a relatively simple pop up mechanism which I introduced in Tutorial Lesson 22, the Floating Tabletop.

The thread, along with an SVG cutting file by Craig, is here. Or download a slightly modified file here. (I removed the pink fill to reveal the cut and fold lines).

The legs form side tabs, gluing base and center post, all in one piece. Brilliant! But is it better than the separate center post?
To test it out I created a three tier version the same size as the Sizzix-type (center post) cake from Part 2.
You will see that I added leg slots to the cake tops as I did to the (Sizzix) design in the previous post.
Download three tier cake file set (PDF, Silhouette Studio, DXF) and use "floating tabletop slotted" files. If you are printing on your paper using the PDF, print the pattern on the wrong side of your paper.
Cut out and assemble tier pieces
The legs on this design are too long to fit on a standard sheet of card stock, so each tier has one complete leg and one that must be glued together.
If you are hand cutting, do not cut the tiers out first. Cut out just the short leg ends for each tier and glue over the shaded areas on the corresponding tier pieces. Allow to dry.

Score fold lines on cake tiers. Cut slots on cake tiers.
Cut out cake tiers and attached legs.

Fold cake tiers in half, first one way, then the other.

Pre-crease the leg fold lines.

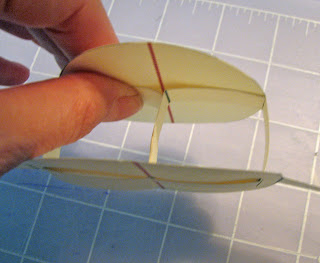
Check the leg length against the cake tiers. Starting with any cake tier, fold one leg in half. The end of the leg meets the fold line at the curved edge of the cake tier.

If the leg extends over the fold line at the edge of the cake tier a tiny bit, trim off the overhang.
Repeat for all six legs.

Slot tiers together
Start by attaching the smallest tier to the middle tier.
Slide legs of the smallest tier through the side slots of the middle tier.

There are four fold lines on each leg. The first fold is on the curved edge of the cake top. Pull the legs through the slots until the second fold aligns with the slot.
Slide both (smallest tier) legs through the slot in the center of the middle tier. Pull through until the third fold aligns with the center slot.


You can fasten the legs together in the center where they touch with double sided tape. Or not. I'm not sure it's necessary. Do NOT glue, though. The moisture causes the piece to buckle, permanently impairing its ability to pop the cake layer up.
Glue the last segment of the leg to the underside of the top tier.

On the underside of the larger tier, tape across the side slots and legs to reinforce. On the underside of the smaller tier, tape across the legs right at the center slot.

Attach the middle tier legs to the bottom tier in the same manner.


Attach cake to base card
Cut slots in base card using template.
Attach bottom tier to base card in the same way you attached the tiers. Run legs through side and center slots, tape legs together in center if desired, glue leg ends to the underside of the largest tier, tape to reinforce.


Finish card
Attach cake sides and finish card as shown at Building a Better Pop Up Cake: Part 2.


And the verdict? It's a little awkward to get at the ends of the legs in this design to glue them to the tier above. For ease of assembly, I think I like the center post design better. Other than that, I would choose the center post if I wanted to attach something to the cake top. If I wanted a plain cake top I would use the tabletop design.
Start by reading Building a Better Pop Up Cake: Part 1 and Part 2.
A different kind of pop cake design, posted by Craig on the Sure Cuts A Lot forum of Craft Edge, caught my eye.

It's based on a relatively simple pop up mechanism which I introduced in Tutorial Lesson 22, the Floating Tabletop.

The thread, along with an SVG cutting file by Craig, is here. Or download a slightly modified file here. (I removed the pink fill to reveal the cut and fold lines).

The legs form side tabs, gluing base and center post, all in one piece. Brilliant! But is it better than the separate center post?
To test it out I created a three tier version the same size as the Sizzix-type (center post) cake from Part 2.
You will see that I added leg slots to the cake tops as I did to the (Sizzix) design in the previous post.
Download three tier cake file set (PDF, Silhouette Studio, DXF) and use "floating tabletop slotted" files. If you are printing on your paper using the PDF, print the pattern on the wrong side of your paper.
Cut out and assemble tier pieces
The legs on this design are too long to fit on a standard sheet of card stock, so each tier has one complete leg and one that must be glued together.
If you are hand cutting, do not cut the tiers out first. Cut out just the short leg ends for each tier and glue over the shaded areas on the corresponding tier pieces. Allow to dry.

Score fold lines on cake tiers. Cut slots on cake tiers.
Cut out cake tiers and attached legs.

Fold cake tiers in half, first one way, then the other.

Pre-crease the leg fold lines.

Check the leg length against the cake tiers. Starting with any cake tier, fold one leg in half. The end of the leg meets the fold line at the curved edge of the cake tier.

If the leg extends over the fold line at the edge of the cake tier a tiny bit, trim off the overhang.
Repeat for all six legs.

Slot tiers together
Start by attaching the smallest tier to the middle tier.
Slide legs of the smallest tier through the side slots of the middle tier.

There are four fold lines on each leg. The first fold is on the curved edge of the cake top. Pull the legs through the slots until the second fold aligns with the slot.
Slide both (smallest tier) legs through the slot in the center of the middle tier. Pull through until the third fold aligns with the center slot.


You can fasten the legs together in the center where they touch with double sided tape. Or not. I'm not sure it's necessary. Do NOT glue, though. The moisture causes the piece to buckle, permanently impairing its ability to pop the cake layer up.

Glue the last segment of the leg to the underside of the top tier.

On the underside of the larger tier, tape across the side slots and legs to reinforce. On the underside of the smaller tier, tape across the legs right at the center slot.

Attach the middle tier legs to the bottom tier in the same manner.


Attach cake to base card
Cut slots in base card using template.
Attach bottom tier to base card in the same way you attached the tiers. Run legs through side and center slots, tape legs together in center if desired, glue leg ends to the underside of the largest tier, tape to reinforce.


Finish card
Attach cake sides and finish card as shown at Building a Better Pop Up Cake: Part 2.


And the verdict? It's a little awkward to get at the ends of the legs in this design to glue them to the tier above. For ease of assembly, I think I like the center post design better. Other than that, I would choose the center post if I wanted to attach something to the cake top. If I wanted a plain cake top I would use the tabletop design.