I made this paper cut lantern for my mother-in-law's 92nd (!!) birthday. I plan to light it with a battery operated tealight.


I made this as a birthday card, but you could swap out the "Happy Birthday" section for another flowered section if you would like a lantern without a sentiment.

How to make a paper cut lantern
Download cutting file PDF or DXF or SVG. (Can you find the mistake on mine that I fixed for you? Hint: bird.)
Cut on black lines. Score along red lines (you'll have to eyeball them on the SVG). Save the tiny inside parts of the following letters: A, P, P, B, R, D, A.
Cut translucent (vellum) paper to fit inside lantern. I used three separate pieces. You can extend the vellum to the top of the windows or cut it shorter, as I did. Trim carefully so the edges don't overlap the vertical creases on the inside of the lantern. Glue vellum pieces to the inside of the lantern.
Glue the little letter pieces in place on the vellum on the outside of the lantern.
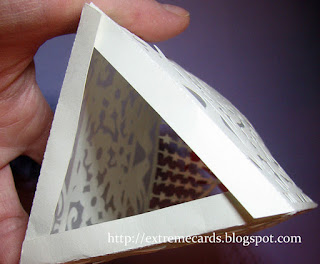
Crease the score lines, curling the lantern into a triangular tube.
Fold in the "ears" on the (left) side tabs and slide the tabs through the (right) slits. Unfold the tabs.

The bottom flaps fold up to make a flat base.

Gather the top circles and tie together with a ribbon.

Place over tealight. This view is from the top.

Credit for the window shape and birds goes to Cindy, from this file. I found the flower motif here.

If you like this design, you would enjoy this book, Silhouette Style: Techniques and Template Sets for Papercut Projects , which I recently purchased. It comes complete with all the cutting files on a CD!


I made this as a birthday card, but you could swap out the "Happy Birthday" section for another flowered section if you would like a lantern without a sentiment.

How to make a paper cut lantern
Download cutting file PDF or DXF or SVG. (Can you find the mistake on mine that I fixed for you? Hint: bird.)
Cut on black lines. Score along red lines (you'll have to eyeball them on the SVG). Save the tiny inside parts of the following letters: A, P, P, B, R, D, A.
Cut translucent (vellum) paper to fit inside lantern. I used three separate pieces. You can extend the vellum to the top of the windows or cut it shorter, as I did. Trim carefully so the edges don't overlap the vertical creases on the inside of the lantern. Glue vellum pieces to the inside of the lantern.
Glue the little letter pieces in place on the vellum on the outside of the lantern.
Crease the score lines, curling the lantern into a triangular tube.
Fold in the "ears" on the (left) side tabs and slide the tabs through the (right) slits. Unfold the tabs.

The bottom flaps fold up to make a flat base.

Gather the top circles and tie together with a ribbon.

Place over tealight. This view is from the top.

Credit for the window shape and birds goes to Cindy, from this file. I found the flower motif here.

If you like this design, you would enjoy this book, Silhouette Style: Techniques and Template Sets for Papercut Projects