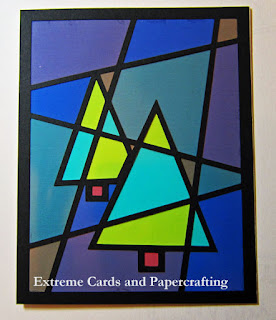
Faux stained glass cards created with printable acetate and black card stock.
Many thanks to Marie Papadopoulou for the inspiration!

I made this flower card for Mother's Day.

Suggested for cutting machines although technically possible to hand cut.
How to make stained glass effect cards
Make it!
Materials:
Printable acetate, also known as transparency film.
This is what I have--I found it at the thrift store. You may be able to buy it by the sheet at office supply stores. Be sure to buy what matches your printer: inkjet or laser.

Black card stock
White card stock
Foam tape or pop up dots
Adhesive: Xyron Creative Station or glue pen
How to make a stained glass card
Scroll down to the bottom for step by step video
A huge thank you to the many readers who support my site with a small contribution when downloading. Pay what you wish for the tutorial and to support this site. Suggested contribution for this project is $2.00.
Trace the picture and create two copies
Choose a pattern--something simple is best. This tulip pattern is from Glass Patterns Quarterly.
Open (or import) the pattern in an editing program such as Inkscape, AI, Corel, or Silhouette Studio.
Size the picture as desired. I made mine 6" high.
If your picture is already a vector file, make a second copy of it.
If your picture is a raster file, trace it to create a vector. Make a second copy of the tracing. Delete the original picture, you don't need it.

Create the Lead Lines by Offsetting or Insetting
Break apart or ungroup the traced shapes.
Create an offset or inset to make the black lines fatter. In Inkscape repeat inset until you like the width of the lines.
In Studio, delete the original tracings, keeping the offset. Release compound path to select these lines, then delete.

Color the Glass
On the other copy of the tracing, break the shapes apart and fill them as desired.

If there is no backing rectangle, create one and fill it with black. (Mine is filled with red at this point.)
Make Frames for Each Piece
Create a 1/2" wide frame around each piece. Your tracing may already have a rectangle around the whole piece that you can resize. Otherwise, draw a new frame and make two copies. Weld one to the lead lines and put one around the glass.

Assemble
Cut the lead lines from black paper. Print the glass piece on the acetate and trim. Adhere lead lines to glass. Adhere to a white card with foam strips or glue dots.

Step by Step Videos
Please refer to the written instructions above as you view.
This is my first attempt at adding supplemental video. Wow, it's hard and time consuming! No audio, sorry, I don't have the technology for that.
Silhouette Studio
Inkscape
(This video begins after you have traced the picture, made a copy, and deleted the original picture.)
Click here for a Christmas trees card. File set includes cut files for lead lines and print files for glass.