Time to assemble the mechanics of the flowered fan card.

You will need:
--Your assembled fan from tutorial part 1
--A base card cut using this template

--A strip of card stock, 2" wide x 11" long
How to attach the fan to the card base
Cut along the solid lines of the cards base.
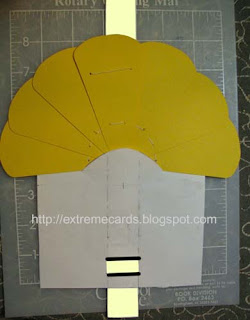
With the fan right side up, insert the bottom of the fan through the curved cut in the base card.

This is what it looks like from the back.
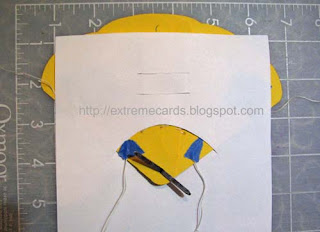
Fold 2" strip in half the long way. Unfold. Measure and mark the horizontal center of the strip (5.5" down from the top). Punch a small hole in the center of one of the halves of the strip, as shown.

Spread glue inside the strip. Now working fast, close the strip, slide it through the cuts in the back of the card with the punched hole down (toward the fan).

Pull the strip up in the center to make a little hump so you can access the punch hole. Close the legs of the brad, put them through the hole and open the brad legs up again between the halves of the strip. Turn the brad until the legs are completely enclosed in the strip. Push down the hump and smooth the strip. Let dry.
Open the fan by pulling on the bottom hole threads and pulling the card stock strip from the top. Tape threads temporarily in place. Mine worked best with the threads directly below the ends of the curved cut, about 3/4" down.
Now pull the card stock strip from the bottom and see if the fan closes properly. Adjust as necessary until the mechanism works to open and close the fan. Tape securely with permanent tape.
Tape or glue the thread ends of the top holes to the back of the fan, too. Trim excess thread.

Front view with the fan open. The brad should be covered by the curved cut in the card base.
Now pull the card stock strip from the bottom and see if the fan closes properly. Adjust as necessary until the mechanism works to open and close the fan. Tape threads securely with permanent tape.
Front view with the card closed.

If needed, add a "stopper" to keep the fan from pulling too far through the curved slit when the fan is closed. (The stopper is the orange strip of card). It is glued to the long strip, just above the bottom slits, when the fan is in the fully closed position.
Notice all the tape on the back of this sample. I used it to reinforce the card at the end of each cut.

Make a card stock vase that covers the threads when the card is fully open. Do not glue the sides of the vase all the way to the top or the fan will not be able to open at the sides. I laid the vase on top of the fully opened fan and marked where the fan pieces crossed the sides of the vase. I glued just the edges of the vase,below those marks.

Trim the excess from the top and bottom of the pull tab. I added a ribbon pull to each end and glued my sentiment to the top of the pull tab.

You will need:
--Your assembled fan from tutorial part 1
--A base card cut using this template

--A strip of card stock, 2" wide x 11" long
How to attach the fan to the card base
Cut along the solid lines of the cards base.
With the fan right side up, insert the bottom of the fan through the curved cut in the base card.

This is what it looks like from the back.

Fold 2" strip in half the long way. Unfold. Measure and mark the horizontal center of the strip (5.5" down from the top). Punch a small hole in the center of one of the halves of the strip, as shown.

Spread glue inside the strip. Now working fast, close the strip, slide it through the cuts in the back of the card with the punched hole down (toward the fan).

Pull the strip up in the center to make a little hump so you can access the punch hole. Close the legs of the brad, put them through the hole and open the brad legs up again between the halves of the strip. Turn the brad until the legs are completely enclosed in the strip. Push down the hump and smooth the strip. Let dry.
Open the fan by pulling on the bottom hole threads and pulling the card stock strip from the top. Tape threads temporarily in place. Mine worked best with the threads directly below the ends of the curved cut, about 3/4" down.
Now pull the card stock strip from the bottom and see if the fan closes properly. Adjust as necessary until the mechanism works to open and close the fan. Tape securely with permanent tape.
Tape or glue the thread ends of the top holes to the back of the fan, too. Trim excess thread.

Front view with the fan open. The brad should be covered by the curved cut in the card base.

Now pull the card stock strip from the bottom and see if the fan closes properly. Adjust as necessary until the mechanism works to open and close the fan. Tape threads securely with permanent tape.
Front view with the card closed.

If needed, add a "stopper" to keep the fan from pulling too far through the curved slit when the fan is closed. (The stopper is the orange strip of card). It is glued to the long strip, just above the bottom slits, when the fan is in the fully closed position.
Notice all the tape on the back of this sample. I used it to reinforce the card at the end of each cut.

Make a card stock vase that covers the threads when the card is fully open. Do not glue the sides of the vase all the way to the top or the fan will not be able to open at the sides. I laid the vase on top of the fully opened fan and marked where the fan pieces crossed the sides of the vase. I glued just the edges of the vase,below those marks.

Trim the excess from the top and bottom of the pull tab. I added a ribbon pull to each end and glued my sentiment to the top of the pull tab.