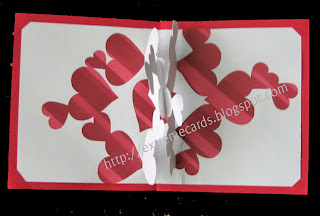
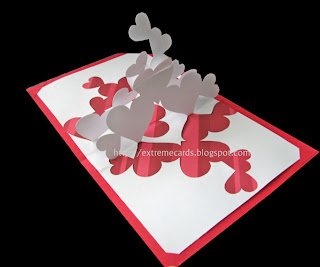
This Valentine pop up card is easier to construct than you would think.
For want of a better name, I call these "meet in the middle" pop up cards.
Half of the design is cut from either side of the card and the two pieces are slotted together.
This card is really an elaborate variation of the slotted X mechanism.
The slotted X is covered in How to Make Pop Up Cards, Lessons 11 - 15 .
How to make the pile of hearts Valentine pop up card
Download and cut out template.
The file set includes score lines for the center fold, and tiny score lines at the heart points. I suggest turning OFF those tiny lines if you are a machine cutter who uses a dotted cut, dash cut, or kiss cut. (My hearts ripped off when I used a dotted cut.) The hearts will fold up easily enough without scoring, or you can hand score.
Download file set: PDF, Silhouette studio, SVG (how to use my SVG files in Cricut Design Space), Silhouette Studio.
Files download for free; pay what you wish for the tutorial and to support this site. Suggested contribution for this project is $1.99.
Remove the large heart that lies on the center fold. Use it on the front of your card or discard.
Crease the fold lines at the heart bottoms, folding both piles of hearts toward the center foldline.
The two halves of the (white) card are purposely cut apart at the center "fold." If you had a fold here you will get a wrinkle when the card is closed due to bulk. I learned that the hard way, you can see the wrinkle in my photos!
Optional: back the cut out with patterned paper before gluing to the base card. I used a red striped paper. Be careful not to get glue on the hearts, just the part they were cut from!
Adhere the two heart halves (white) to the base card (red), leaving a tiny gap between them along the center fold of the base card. Take care not to get glue on the hearts.
Here's one by Molly Lee to show you what I'm talking about.
Pull the hearts toward each other and slot together above the center fold of the card.
The card lies flat when opened.
More about how this card works for the mathematically inclined....

The measurement from the center fold of the card to the crease line of the hearts is the same on both sides of the center fold. (Shown in red.)
If you draw a line from the end point of one slot to the end point of the other, you have a straight line perpendicular to the center fold. And each end point is at equal distance from the center fold. (Shown in blue).
23 comments :
I love it when I see your pop ups...you don't just do pop up cards you DO pop up cards to the fullest.
Carole
I love this card thank you so much for sharing it x
This is so great! Inspirational as always!
Molly
tinif: a musical instrument designed for mice
I love Your GSD files!!!!
Your post certainly made my day... As it usualy does keep up the Awesome-ness
Off i go to cut this on my silhouette sd!
Yippee!
Very cute! TFS!
Looking at the template confuses me, but I trust you. Looking at the finished product is exciting, and I will definitely try this. It will earn a WOW from my husband, who only comments when I make him cards that DO something. Otherwise, it's a "that's nice" response. This will get a WOW, I know it.
Oh! it is a well made and beautiful card
Thank you so much for this Freebie. I want to let you know that I posted a link to your blog in Creative Busy Hands Cricut Freebies Search List, under the Valentines post on Feb. 13, 2010. Thanks again.
Carol, maybe because the template is in portrait and the card is in landscape?
So look at the template and envision pulling the hearts down from the top part and up from the bottom part to meet in the middle.
Also, the heart across the foldline is completely cut out and discarded. Or you can save it to use on the front of your card!
OMG!!! This is gorgeous! Your work is always inspirational...thank you so much for sharing your ideas. It's just so lovely! :)
So cool! Thanks for sharing your creativity!
This is cool! My skeptical self can't wait to try it!!! Thanks!!!
Karen
My Wife just loved the card. Made last weekend and gave it to here on Valentine. Thanks for sharing and your blog
Hello!
I made your card (twice) and it was quite the challenge! :<) Thank you for the great pattern - I love all of your creations and check your blog every day! I posted one of my cards today and have a link to your blog.
Wishing you a great day today!
Barbara Diane
it´s lovely, congratulation!! thankyou, my whife love´s it.
Hey there, found this site while looking for a nice pop up card for a wedding card. And found this. Fantastic job!
I'd like to credit you fully, if you don't mind, but couldn't find your name on the site.
Here's my result: http://www.happyfolding.com/gallery-pile_of_hearts_pop_up_card
thanks for sharing <3 I really love it
Thank you for sharing your creations and the files! It cut so well on my cameo!
How do we actually cut the hearts?
You can hand cut from the PDF. Print the template on the BACK of your card stock. Cut black lines with a craft knife. Score the red lines.
Hi Carol!
Huge fan!
Anyways just wanna ask, what do you think of my 3 Cs to cardmaking?
Class- So who are you making it for? How old are they? What gender?
Colour- Choosing a suitable colour pallete is essential, don't choose clashy colours!
Composition-Be careful how you balance the card out, often it looks more realistic to seperate decorations rather than clump them!
So what do you think? I'm trying to make this a general guide for me but I need a professional to review it first! Thanks!
Thank you
Cutting out all those hearts look a bit tricky but the effect seems well worth it! This card will be going on my to-do list :)
Post a Comment